Brand
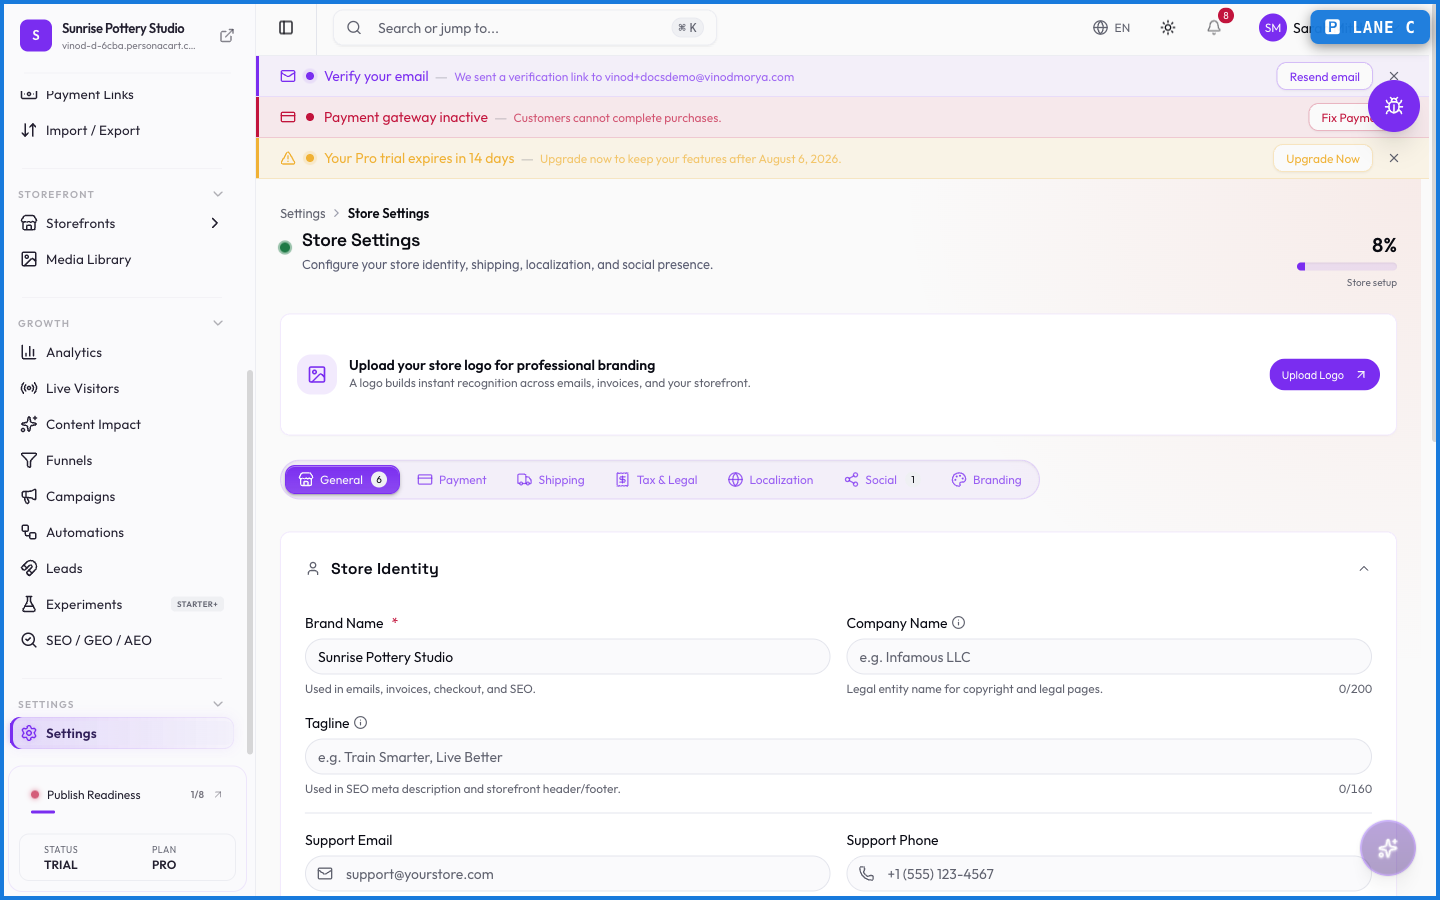
Brand settings are your store's identity — its name, logo, and the details that show up everywhere your store appears: the storefront header, invoices, and emails. Set them once and they carry through.
Where to find it
Sidebar → SETTINGS → Settings → Store Settings.
What happens — and what doesn't
- Your brand name and logo appear on the storefront, invoices, and emails — one identity across every touchpoint.
- The theme controls the look (colors, fonts); brand settings control the identity (name, logo).
- Invoices name your business as the seller of record, drawn from here — which matters for tax documentation.
Where does my store's logo appear?
Across your storefront, on invoices, and in the emails your store sends — brand settings are the single source for your identity.
What's the difference between Brand and Theme?
Brand is your identity — name and logo. Theme is the look — colors, fonts, layout. Both shape how your store feels, from different angles.
Every field on this screen
Every field on your store's identity settings. Read straight from the live app, so it matches what you see.
| Field | Type | What it accepts | What it does |
|---|---|---|---|
| Brand Name * | Text | — | |
| Company Name | Text | — | |
| Support Email | Text | — | |
| Support Phone | Text | — | |
| Tagline | Text | — |
5 fields, read from the live app. Which ones you see depends on the product type and your plan.
What this screen looks like in every state
| State | When you'll see it | What you see, and what to do |
|---|---|---|
| Loading | The screen is fetching your data | A skeleton in the shape of the finished page. It should be brief — if it persists, the load has failed rather than stalled. |
| Error | The data couldn't be loaded | A message with a retry. Retry first: most of these are a dropped request, not a broken store. If it repeats, the outage is upstream and reloading won't help. |
| No access | Your role doesn't include this screen | A permission notice instead of the page. An owner or admin can grant access under Settings → Team. |
When something goes wrong
These are the messages this screen can show you, and what each one means.
| If you see | What to do |
|---|---|
| At least one payment method must remain enabled | The payment provider rejected it. Check your gateway connection under Settings → Payments. |
| Copy failed — please copy manually | Retry the action. If it keeps happening, contact support with what you were doing. |
| Copy failed — select the URL manually | Retry the action. If it keeps happening, contact support with what you were doing. |
| Could not start Stripe onboarding. Backend returned no authorization URL. Please try again or contact support. | The payment provider rejected it. Check your gateway connection under Settings → Payments. |
| Could not switch Stripe environment. Please try again. | The payment provider rejected it. Check your gateway connection under Settings → Payments. |
| Enter your test or live credentials first. | Do what the message asks, then try again — it names exactly what's missing. |
| Failed to disconnect. Please try again. | The change didn't save. Retry — if it keeps failing, the request isn't reaching the server. |
| Failed to generate Stripe link | The payment provider rejected it. Check your gateway connection under Settings → Payments. |
| Failed to save | The change didn't save. Retry — if it keeps failing, the request isn't reaching the server. |
| Failed to update auto-convert setting | The change didn't save. Retry — if it keeps failing, the request isn't reaching the server. |
| Failed to update payment method | The payment provider rejected it. Check your gateway connection under Settings → Payments. |
| Please fix the tax-ID format errors before saving. | Do what the message asks, then try again — it names exactly what's missing. |
| You set … as the active mode but did not enter … credentials. | Retry the action. If it keeps happening, contact support with what you were doing. |